Introduction To Camera Controls. How To Use f/Stops, Shutter Speeds & ISO To Control Exposure.
For any given scene that you might want to photograph, there is a proper exposure value. This value is expressed as a combination of f/stop, shutter speed, and ISO. By exposing the image properly you will be able to render detail in the brightest areas of the scene as well as the darkest areas of the scene. Understanding how to use the controls on your camera will allow you to capture what you see and give you the creative freedom to express your vision.
Exposure is based on three factors;
1. Sensitivity (ASA/ISO)
2. Aperture (f/stop)
3. Shutter Speed
ISO Sensitivity
The ASA/ISO rating refers to the camera sensor or film’s sensitivity to light. Digital cameras allow you to adjust the sensitivity within a specific range. Films have a single ASA rating. The higher the number the more sensitive. Low ASA/ISO numbers (100) work best in bright light and will yield the sharpest, cleanest images. Using a high ASA/ISO (3200) will work best in low-light situations or when a fast shutter speed is needed but will typically introduce some digital noise or film grain into the image.
Remember
Low ISO is less sensitive to light but provides clearer images.
High ISO is more sensitive to light but increased sensitivity adds noise.
Aperture (f/stop)
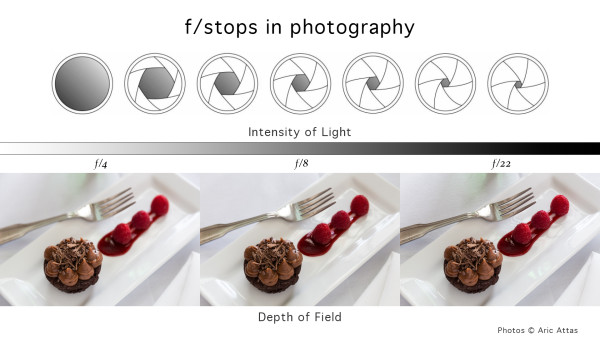
The aperture in your lens is similar to the pupil of your eye. Its basic function is to control the intensity of the light entering the camera. Aperture sizes are indicated by f/stops such as f/2.8, f/4, f/5.6, f/8, f/11, f/16, f/22. The numbers are technically ratios (can be thought of as fractions for simplicity) so the smaller the number the larger the aperture. This means f/2.8 is larger than f/22.

Illustration demonstrating the effect of f-stops on the intensity of light and depth of field in photography.
Shutter Speed
Inside your camera is a screen that opens and closes at a fraction of a second. This shutter controls the duration of the light entering the camera. Shutter speeds are generally designated by fractions, this time fractions of a second. 1/4000, 1/2000, 1/1000, 1/500, 1/250, 1/125, 1/60, 1/30, 1/15, 1/8, etc. On your camera they may be designated in whole numbers such as 1000, 500, 250, 125, 60, etc. so remember they actually refer to fractions of a second. 1/1000th of a second is a shorter amount of time than 1/60th of a second. It is possible to shoot for seconds. Most digital cameras will allow you to time speeds as long as 30 seconds. This would look like 30″ on your camera. If you need to shoot for longer you can use Bulb mode which holds the shutter open as long as the shutter button is depressed. This works best with a remote control to prevent camera shake.
ASA/ISO
Before you begin shooting you should always set your ASA/ISO to meet your needs. Do you need to stop motion under low light conditions or want to use the smallest aperture possible, or are you shooting under bright light conditions and need to be able to limit the light coming into the camera? Keep in mind it’s best to keep your ASA/ISO as low as possible to retain the subtle details in your image.
Photographic Exposure
Imagine you are filling a cup of water using the sink. In order to fill it to exactly 1 cup you must control the flow or intensity of the water as well as the amount of time or duration of the water flow. You can fill the cup quickly with an intense flow of water, or fill it slowly with a dripping faucet. Either way, the cup gets filled.
Balancing the intensity with the duration is exactly the technique you will use to properly expose your images. You can use an intense light (large aperture) to expose your sensor quickly, or you can use a dim light (small aperture) and expose it over a longer period of time. The exposure will be the same as long as the settings are proportional.
Light Meters
Today’s cameras have light meters built into them making it relatively easy to properly expose your images. When you look through your viewfinder and press the shutter release button halfway you should see either a needle that moves up an down or lights that move and/or change color as you look from a bright scene to a dark scene. Make sure your camera is on before you try this. Some cameras have an on/off switch, others turn on when you pull back on the film advance lever.
Depending on your particular camera you will move your aperture and shutter speeds so that the needles line up, the green light comes on, or the needle lines up between the plus and minus signs. On some cameras the meter will tell you where to set the shutter speed based on the film speed and the aperture you have selected. This process takes a little practice but you will soon find yourself getting very comfortable with it.
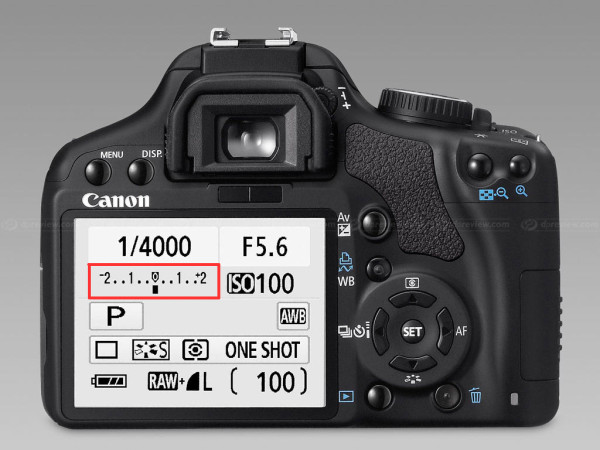
On digital cameras the meter is represented by a series of lines with markings indications -3, -2, -1, 0, +1, +2, +3. You’ll notice smaller lines in between the numbered lines representing 1/3 stops. Pressing the shutter release 1/2 way will engage the meter and you’ll see a small mark somewhere on the scale. Adjusting your aperture and/or shutter speed so that the indicator moves to the 0 will give you a proper exposure. If the indicator disappears press the shutter halfway down again to reactivate it. It will typically only stay on for a few seconds to conserve battery strength.

Light Meter on Canon dSLR – photo www.dpreview.com
Equivalent Exposures
Once you have determined a basic exposure such as f/8 at 1/250th of a second you can vary the aperture and shutter speeds proportionally and maintain the proper exposure. This will allow you to control how your photographs look. For example: Imagine you are at a race track. You want to photograph the cars so that they are sharp in order to read the details. This means you need a fast shutter speed such as 1/1000th of a second. If your basic exposure was f/8 at 1/250th of a second you can move your shutter speed 2 stops to get 1/1000th of a second. You must then compensate for the increase in shutter speed by opening the aperture by 2 stops as well. This will balance the exposure. Your new exposure will be f/4 at 1/1000th of a second.
Note: Each click of the wheel is 1/3 of stop for both aperture and shutter speeds. If you open the aperture by 3 clicks say from f/8 to f/5.6 adjusting the shutter speed by 3 clicks from 1/250 to 1/500 second will give the same exposure.
Bracketed Exposures
Bracketing exposures is useful if you’re unsure of your exposure or want a variety to work with later in post-production. An example of bracketing would be setting your camera at f/8 @ 1/250 @ ISO 100. This should bring your meter to zero on a bright, sunny day. Changing the f/stop OR the shutter speed OR the ISO without changing the other settings will allow you to make exposures that are brighter or darker than what your meter is suggesting. See Lesson 1 for more details.
