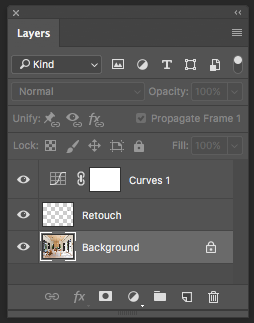
Layers are an important part of how Photoshop works. Using layers in your photoshop workflow will help you make non-destructive edits while maintaining the ability to go back and modify prior changes. Many of my students find layers a bit confusing at first so here are some basics to help you get started using layers in Photoshop CC.

Layers window in Photoshop showing a background layer, new layer for retouching and a curves adjustment layer.
Different Types of Layers in Photoshop
Background Layer
When you open an image in Photoshop it automatically becomes a background layer. This layer has pixels or “picture elements” that make up the image you see.
By default it is locked which means you:
- Can’t reposition it
- Can’t change it’s stacking order
- Cannot have transparency
To change these restrictions you can convert the background layer to a regular layer. Choose Layer > New > Layer From Background… or simply double-click the background layer. It will now have the name Layer 0.
I strongly encourage you to use additional layers for your edits. These layers are described below.
New Layer A transparent layer with no pixels – great for retouching, adding gradients, dodging + burning, text, shapes, etc. Note: make sure “Sample All Layers” is selected in the tool options panel when using the spot healing brushes or clone stamp.
Adjustment Layer Has no pixels but a set of instructions allowing non-destructive image adjustments while maintaining ability for future edits. Easy to protect parts of the image using layer mask. You can also modify the effect by changing the Blending Mode located at the top of the layer panel. The blending mode is set to Normal by default.
Duplicate Layer Creates a new layer by duplicating pixels. Use when necessary for retouching tools that require pixels to work, i. e. Content-aware fill. You can also change opacity and/or blending modes to modify the effect.
Modifying Layers in Photoshop
“Eye” or Visibility icon on left side of layer panel allows you to toggle layer visibility on and off.
Opacity Slider at top of layer panel will increase or decrease opacity of the layer. You can click and drag on the word Opacity to utilize the “scrubby slider”.
Blending modes at top of layer panel offer 27 different ways to change the way layers interact with each other. Holding your mouse over the blending mode will preview the effect.
The Blending Modes are grouped as follows:
- Darken blending modes – Neutral is white, white disappears
- Lighten blending modes – Neutral is black, black disappears
- Overlay blending modes – 50% grey is neutral, adds contrast by making values under 128 darker and from 128-255 brighter
Layers can be dragged up or down to change order and put into groups to make management easier, except for Background layers.
Make sure correct layer is selected by clicking on it in once the layer panel before making modifications. The layer will highlight in blue. Click and drag until you see a highlight where you want it to stick.
